Learn about the most innovative kitchen appliance – the Thermomix ® -, which has recently been launched on the US market! It is 12 appliances in 1 and can help to make your life easier, when it comes to cooking!
We cannot stop to make variations of this bread! It’s so crunchy outside and so fresh and fluffy inside… In Germany we would call it “Mischbrot” (mixed bread). It’s originally made with different types of flour. I just used 620g all purpose flour and 80g whole wheat flour.
The secret to get this crust is to use a lidded casserole or Dutch oven.
Making doughs in the Thermomix is so easy… honestly – if we would not be owners of this wonderful, amazing and capable Thermomix, there wouldn’t be any bread in our house! This kitchen appliance for us is really a life changer! – And it brings so much more fun in our life when it comes to cooking and baking😎.
Do you know these days when its not only hot outside but you have the feeling your blood is cooking and your body doesn’t want to cool down? – Today is such a day for me here in the city of angels. And I definetely need something to get my body cooler!
During my juicing experiences (100% juice fasting) I recognized that everytime I drank a green juice with peppermint, my body felt cooler than normal. So, what do you think might be the conclusion for me? – Exactly: when you want your body cool down, add peppermint!
We still had a huge watermelon 🍉 in the fridge, so I started making fresh watermelon juice from the scratch. Simply added some peppermint leaves out of the garden and a little lime. That’s it! – It’s so delicious & refreshing!
What is your favorite drink for hot days?
INGREDIENTS:
1 big watermelon
10 peppermint leaves
1 lime (peeled and cut in 4 pieces)
1 big container (to store the juice in the fridge)
INSTRUCTION:
Cut the watermelon into two pieces.
Cut out the watermelon pulp and place into the Thermomix® mixing bowl as much us you can fit in.
5sec/-/speed 5
If there is still space left, add some more watermelon
1:30min/-/speed 10
Ready to drink or fill into prepared container!
Delicious & Refreshing: Watermelon Slush with Peppermint & Lime
We actually love Yogurtland – but we are more and more into eating conscious, especially when it comes to hidden sugars.
And as there are a lot of fresh and delicious fruits available out there, we bought a bunch of bananas, nectarines and mangos, cut them in pieces, put them on a tray in the freezer over night and then in zip bags – ready to use for days like today.
And when we are craving for ice cream, we make a delicious ThermoLin’s Yogurt Ice Dream…. so 😋!
For easier preparation I use the recipe “Frozen Fruit Sorbet“. It’s in The Basic Cookbook, which is part of the package you get when you purchase a Thermomix – and therefor also on the Thermomix Cook-key®. The Cook-key®, this little magnetic box which can be attached to the Thermomix when using, is THE DIGITAL REVOLUTION! This little magnetic box makes cooking so much easier and so much fun – and still gives you the chance, like you will see here, to adapt the recipes to your own needs – and be the master of the cooking process!
ThermoLin’s MaNeBa Yogurt Ice Dream
INGREDIENTS:
0.4 oz organic brown sugar
7 oz frozen mango pieces
7 oz frozen nectarine pieces
3.5 oz frozen banana pieces
1 egg white
1 tsp vanilla sugar (selfmade)
2 tbsp greek yogurt
INSTRUCTION:
Place sugar into bowl
Grind 10/-/10
Add fruits, egg white and vanilla sugar
Mix 1’30/-/5
Adjust butterfly whisk on blade
Whisk 1’30/-/3
While whisking, add yoghurt
That’s all!
Have fun and enjoy!
More tips can be found in The Basic Cookbook.
Let us know, when you have any questions!
Which ice cream do you at home? What are your favorites?
We have a new favorite bread – garlic baguette 🥖 🥖🥖
It tastes so yummi and is so fluffy! Found it at the German Cookidoo® Portal, included in my Cookidoo® membership for the Thermomix® (like all the other country portals where the Cookidoo® has been launched!).
INGREDIENTS:
2 clove garlic
20g olive oil
500g all purpose flour (we chooses an organic one)
1 package dried instant yeast
300g water
1 1/2 tsp salt
INSTRUCTION
Place
2 clove garlic in mixing bowl
chop 3/-/8
add
20 g olive oil
sautée for 3 min/120C/1
add
500g all purpose flour
1 package dried instant yeast (we always use this one instead of fresh yeast)
300g water
1 1/2 tsp salt
3min/kneading
Form dough into ball and place in greased bowl, set aside for 20 min
On a lightly floured surface make a rectangle, sprinkle with flour and with the help of a dough scraper carefully cut 3 baguettes.
Place baguettes on with parchment paper covered tray. Cut in diagonal as much as you like, cover with cling wrap, set tray aside on a warm place and let it grow for another 1 hour.
Preheat oven to 495F.
Bake for 15-25 min (depending on your oven)
Enjoy with butter, tomato cream cheese spread or ham and cheese – or simply eat it as is.
Baking bread has never been easier!😋😋😋
Let us know whenever you want to be a part of the Digital Cooking Revolution – contactus for a Cooking Experience at your place and let’s see whether this amazing new kitchen appliance might be something for you!
No time for a personal Cooking Experience or not located in Los Angeles?
Not a problem at all: we show you all the details in a personal video call! If you are interested, just send us a message with your phone number via our contact form.
Not interested at all?
Maybe the Thermomix® might be perfect for somebody in your family or your friends. Then invite them to our group or show them our posts and connect them with us. You never know!
Have you ever checked the ingredients on a package of grated parmesan cheese? I did – and again, it wasn’t really delightful! There was so much more than only the cheese in it! And especially for people with food sensitivities, it’s nothing which I would recommend to eat. I had my own experiences with it a few years ago, and believe me: you won’t go through this!
That’s why one of my favorite basic recipes (apart from so many others, like the delicious vegetable stock paste or simple cooked rice for the week) is Grated Parmesan Cheese.
I always get the big pieces from Costco and simply use the guided recipe from the basic cookbook!
Within 3 min you have your own container of ready-to-use parmesan cheese for the next weeks:
Cut the cheese into 1 inch pieces
place 3.5-4 oz parmesan in mixing bowl
grind 10-20 sec/speed 10 (depending on how fine you want your parmesan)
I looooove noodles -apart from that I need to go mainly gluten free and they have a lot of carbs ;-).
But I haaaate cooking them, because you always have to have an eye on them not to overboil. That might change from today on: I did my first spaghetti with the Thermomix 😄!
Ok, some of the spaghettis were kind of sticking together, but maybe thats due to them being made from brown rice and quinoa. Next time, I’ll try to put them in several portions through the whole in the lid. Maybe that prevents sticking together. But I’m really surprised about how good they were still in shape and the end of the cooking process (to be honest: I expected them to come out kind of chopped or mashed)! – I still can’t believe it!
And this it how it looks like in action when you start cooking them:
There is no spaghetti without a sauce. Luckely, I had some tomatoe sauce in the fridge which I cooked a few days ago, while on the top I was steaming veggie and fish in the varoma (I love this cooking on different levels!). I also had some bacon cubes and onion, so I did what I often do: I take a recipe – in this case the spaghetti carbonara – and adapt it to what I have available :-).
What you need:
4.5 oz onion (appr. 1/2 big onion)
2.5 oz bacon cubes (was a ready-to-use package from Walmart’s Great Value)
1 oz olive oil
1 tsp vegetable stock paste (preferably home made)
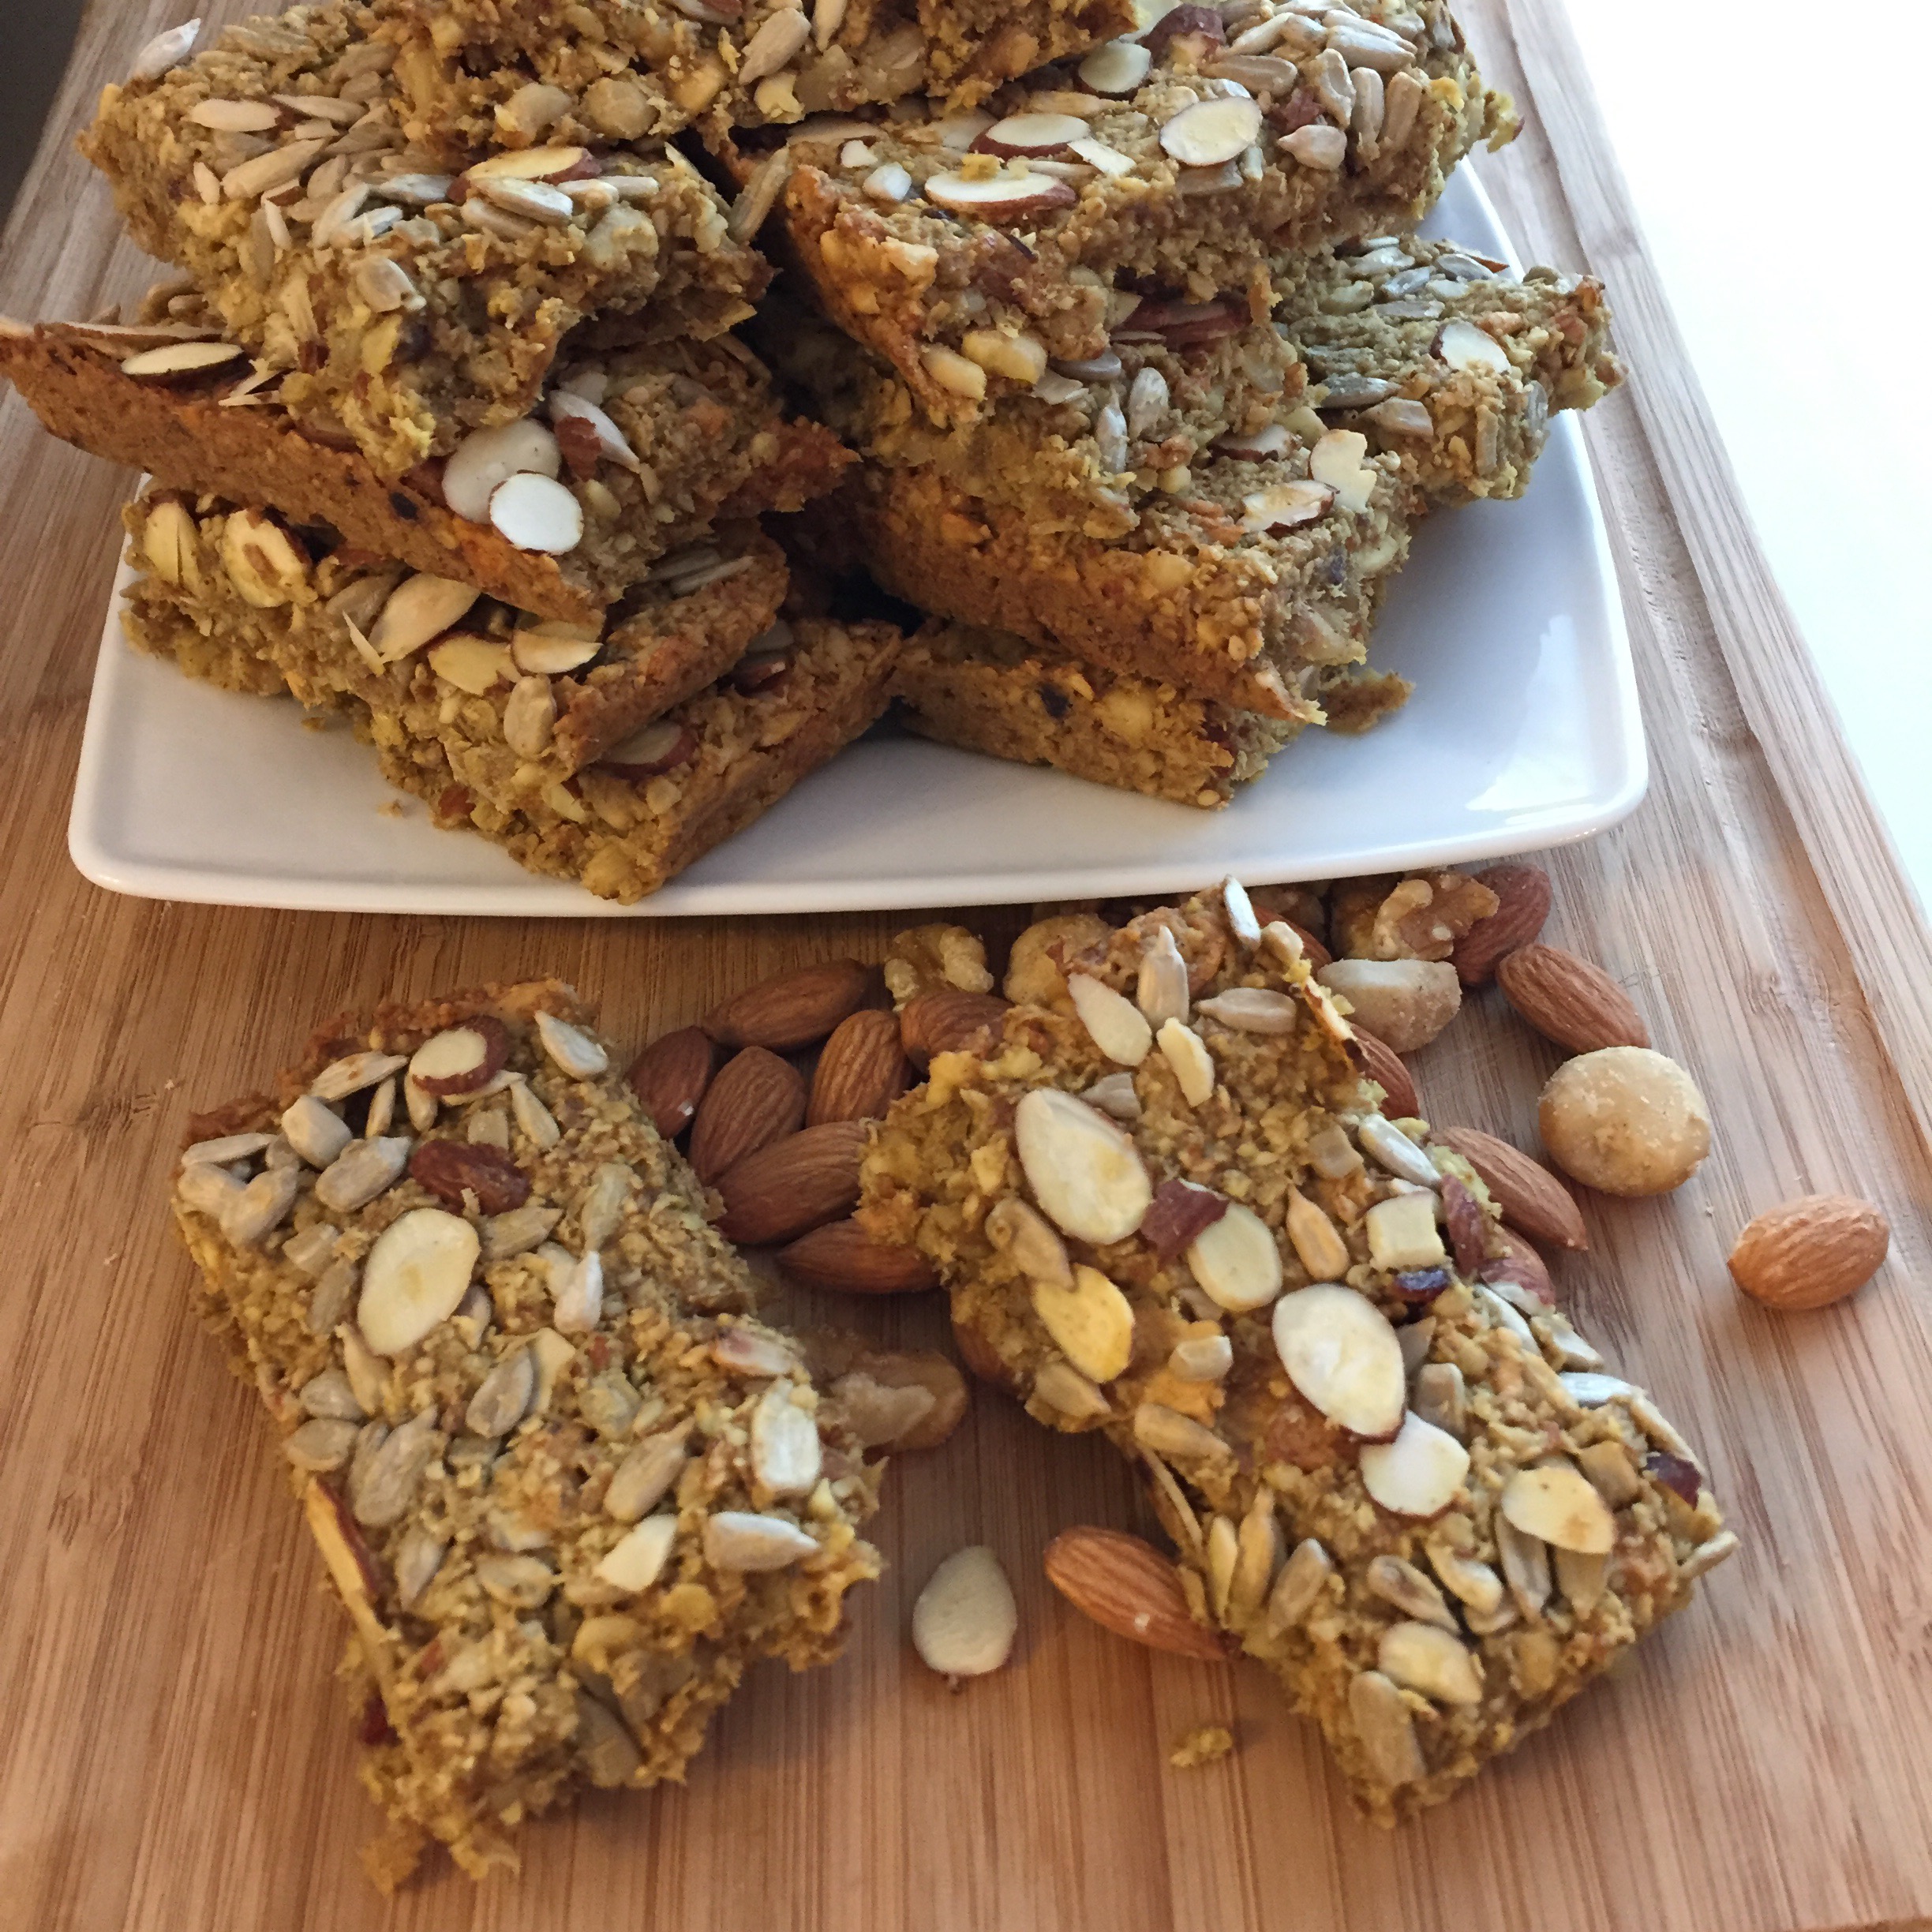
If you are intolerant to gluten and are looking for a delicious gluten free snack which fills up your sugar level, yet doesn’t have thousands kinds of different hidden sugars and preservatives, try this delicious Gluten Free Energy Bar. If you do not need to go gluten free, just change to normal rolled oats, and you will be as happy about your own energy bars as I am :-).
It’s full of healthy ingredients, like different kinds of nuts, gluten free rolled oats, agave syrup, honey, coconut oil, dried fruits and organic lemon juice.
And the best: ist just soooo easy to make it with your Thermomix!
Unfortunately, there is no guided recipe available. I was looking through some German recipes and decided to make a little experiment: I mixed the Banana Nut Crunch and the Soft Cereal Bar.
And here it is:
INGREDIENTS
100 g (3.5 oz) almonds
300 g (11 oz) nuts mixture
I chose raw unsalted cashews, walnuts, macadamia (100 g/3.5 oz each)
100 g (3.5 oz) dried fruits
I mixed dried organic apples with pitted dates
100 g (3.5 oz) agave syrup
100 g (3.5 oz) honey
70 g (2.5 oz) coconut oil
30 g (1 oz) fresh pressed lemon juice
1 ripe banana (broken in 4 pieces)
1 pinch salt
1/2 tsp cinnamon
1/2 tsp cardammom
1/2 tsp turmeric
240 g (8.5 oz) rolled oats
30 g (1 oz) coconut flakes
20 g (0.7 oz) sesame
30-50 g (1-1 1/2 oz) sunflower seeds
30-50 g (1-1 1/2 oz) sliced almonds
middle sized baking trail, covered with parchment paper
Preparation in advance
When I need a lot of different ingredients for a recipe, I usually prepare them in advance. Then it’s easier to concentrate on the preparation itself – and it’s more fun, too. And guess what: I use the scale of my Thermomix®!
How? Just set the mixing bowl lid in position and place an empty bowl or container on top in which you want to fill your ingredients. Then press the scale button below the digital screen (the one next to the home button), make sure the current value is “0” (if not, press “Tare”) and then start filling in the ingredients until you reach the amount you need. – No separate scale necessary!
INSTRUCTION
Preheat oven to 120°C (320°F).
Place almonds in the mixing bowl and grind 4 sec/speed 7, fill in a bowl and set aside.
Place your preferred nuts in the mixing bowl and grind 7 sec/speed 4, then add to bowl with almonds and set aside again.
Place dried fruits in mixing bowl and grind 5 sec/speed 7, fill in bowl (either a separate one or the one where you already put your nuts in) and set aside again.
Place coconut oil, agave syrup and honey in bowl, then heat up 5 min/100°C (212°F)/speed 1.
Add lemon juice, banana, salt, cinnamon, cardamon and turmeric, then mix 5 sec/speed 8.
Now add rolled oats, nut mixture, coconut flakes and sesame and mix 40 sec/reverse/speed 3.
Spread the mixture evenly on the backing tray.
Cover with sunflower seeds and sliced almonds, thereby press them a little bit into the mixture.
Carefully precut into 24 pieces (doesn’t have to be cut till the bottom already)
Bake 30 min on 120°C (320°F).
Take out of the oven and let it cool down for at least 30 min, then make the final cut and let cool down and dry for a few hours, until it’s getting harder. Then make the final cut.
Especially in this ‘colder’ season, I prefer my homemade bread in the morning – with cream cheese, preferably ARLA (got it in Ralphs) and jam. So yummie! But as I am usually (apart during holiday season 😉 ) concerned about my health and have a very sensitive body, I do not really like the jam from the shelf, with lots of industrial sugar and preservatives or additives like ‘natural’ flavors.
Guess what? Exactly, I made my first ever homemade jam out of limes – from my mother-in-law’s garden. And believe me or not, I will never BUY jam anymore!
And not only that it’s much healthier, but with the Thermomix® it’s also very easy and quick, compared to the procedure my grandma did!
INGREDIENTS
6 organic limes (appr. 16 oz)
200 ml water
500 g sugar (16 oz) (I meanwhile use organic brown sugar)
In my second jam cooking session, I tried 1 package MCP Premium Fruit Pectin & 100 g organic pure cane sugar. It’s not that sweet and the lime taste is more intense. In case you like to have it more sweet, just adjust the amount of sugar before you start cooking.
Put a little plate in the freezer (for the setting point test later)
Cut top and bottom of lemon
Cut lemons in quarters and remove seeds (I was lucky there were none)
Put in mixing bowl and blend 20 sec/speed 6
Add the water and sugar and blend another 10 sec/speed 6 or
Cook 28 min/Varoma/speed 1- to prevent splashing, I put the simmering basket on top of the bowl instead of the measuring cup – if it’s splashing too much, set temperature lower, but not less than 212! In case you cook with less than 500 g, you might extend the cooking time for 2-5 minutes.
Put some jam on the plate that’s been in the freezer and if it is the consistency you like, pour into sterilized jars – if not, cook another 2 minutes and try again. Repeat this until you have the consistency you want.
Fill the jam in the sterilized jars and turn the glasses up-side-down and let it cool before you store it.
You can use the same recipe for other fruits. I already tried a mixture out of blueberries and limes, which also tastes delicious! Which homemade jams do you like most? You are welcome to share your favorite recipes with us!
Do you like bread? Then I have something for you today:
Multi seed bread (normal or gluten friendly) based on the UK Basic Cookbook recipe for Five Seed bread
I actually follow the guided recipe, only the seeds I mix up before and then put all together in the bowl. You can do the steps manually as well, of course.
500 gr water (18 oz)
2 tsp dry yeast
(I take one paket Fleischmann’s Rapid Rise Instant yeast, which comes out to 2 1/4 tsp – our friend Peter, who is a baker, said that’s totally ok)
Both come into the mixing bowl.
Heat up for 2 1/2 min/37C (100F)/speed 2
During this time I quickly grease the loaf tin and set the oven to 80°C (170°F), which I found out is perfect to let the dough grow later.
Then put all other ingredients together in the mixing bowl
500 gr flour (18 oz)
(We use 100% Whole Wheat Flour from Wheat Montana – the original recipe just says bread flour) – as I have a gluten intolerance, I try not to eat too much gluten, so I mix 1/2 whole wheat and 1/2 buckwheat flour and add a heaping tsp xantham gum)
1 tsp Salt
40-50g Oats
30 g (3 tbsp) Pine seeds
30g (3 tbsp) Sesame Seeds
30g (3 tbsp) Flaxseeds
30g (3 tbsp) Sunflower Seeds
30g (3 tbsp) Chia Seed
30g (3 tbsp) Psyllium Fiber
30g (1 oz) Honey (or agave syrup)
30g Olive Oil
Set kneading function to 2 1/2 min.
Dough after 2 1/2 min kneading with Thermomix
The first time I made this dough, I was kind of irrated by the consistency of the outcoming result, as it’s more like a slimy batter than what you expect for a dough – very liquid. Maybe I put a little to much water and used half normal all-purpose flour and half whole grain flour, which of course has a huge influence on the dough). But the bread came out perfect, with a nice crust and very fluffy inside!
This time I made one bread with whole grain flour only and one with half whole grain flour and half selfmade buckwheat flour. Both batters came out sticky, but not liquid anymore.
Dough in loaf tin
Fill the dough in the prepared loaf tin make sure to press it on the ground and into the corners, otherwhise you might get a surprise later).
If you like to have some seeds on the top, brush the top with water, spread some seeds and press them a little into the dough (I didn’t do that this time and 90% of them fall down when I took out the bread out of the loaf tin).
Put the loaf tin in the preheated oven for 30 min to ket the dough grow.
After 30 min I set the oven temperature to 200°C (400°F) and bake the bread for 30 to 45 min (depending on how crunchy you want to have the crust, extend the time – I prefer not to hard). If you do not use the oven to let the dough grow, you might refer to the original recipe, which says 45-60 min). I’m using a skewer to check whether the dough is still sticky inside. If not, I take it out and let it cool down. Best is to put it on a grid or after 15 min turn it upside down, so that the bottom of the bread can fully cool down and dry.
A yummi, healthy, whole grain bread with a lot of nutrition and without any preservatives! And it’s so easy to make with this kitchen chef!
Here you can find a similar recipe in an English community forum for Thermomix:
 We cannot stop to make variations of this bread! It’s so crunchy outside and so fresh and fluffy inside… In Germany we would call it “Mischbrot” (mixed bread). It’s originally made with different types of flour. I just used 620g all purpose flour and 80g whole wheat flour.


 Do you like bread? Then I have something for you today:

